Thursday, May 31, 2012

DIY: Ammunition Packing Box (Lots of photos)

We Civil War/WBTS reenactors are lucky in that much of our gear can be made by hand, unlike other time periods in which reproductions or very rare originals are the only way to go. (Example: factory folded or welded metal ammo boxes for WWII or Vietnam)  Just about everything in the mid 1800's was made from natural organic materials; such as cast iron, wood, rope, leather or animal hide, wool or cotton, which were found virtually everywhere and could be shaped or constructed cheaply and by hand, most without the aid of machines or factories.

As a hobby, this means we can make our own stuff for cheaper than sutlers will sell it. Think about it.  There's a lot of potential of fun hands-on projects for Do-It-Yourselfers.

If you're a more conscientious reenactor, you notice a lot of non-period things people bring with them to reenactments.  Things like big plastic bins from Wal-Mart to hold their accouterments, or coolers under wool blankets.  It would make sense that the more time period-appropriate containers you have for 19th century reenacting to carry stuff in, the less stuff you have to carry back to your car or try to conceal in your tent once your camp is set up. 

Well, there are ways to replace or otherwise conceal these modern items with more appropriate objects that would actually be seen laying around a military campsite in 1862. Mainly, lots of big hardtack ration packing crates and smaller ammunition crates.  The ammunition boxes of the 19th century were made of wood; the most readily available resource in the heavily forested American frontier.  Ones made by the Northern arsenals were painted different colors to indicate the type of ammunition packed inside them, and boxes from the Southern arsenals usually were not, because they were short on everything and paint was expensive and not always necessary.  In any case, they were stenciled (by hand and with white paint) with the rough number of rounds in the box, the type of shot, and the arsenal it was shipped from; and in some but not all cases, the month and year it was packed.

A good and common example of what they said would be 1000 CARTRIDGES, CALIBER .58, MINIE BALL, FRANKFORD ARSENAL, 1862.  Most infantry rifle round boxes from the Union were painted either an approximation of the 20th century camouflage "olive drab" color, blue or red in the case of artillery cannon shot.


go here for some examples of real and reproduction crates:
http://charliesboatworks.com/images/CivilWarRifleAmmunitionBox.jpg
http://charliesboatworks.com/rifleandmusketammunitionboxes2.htm


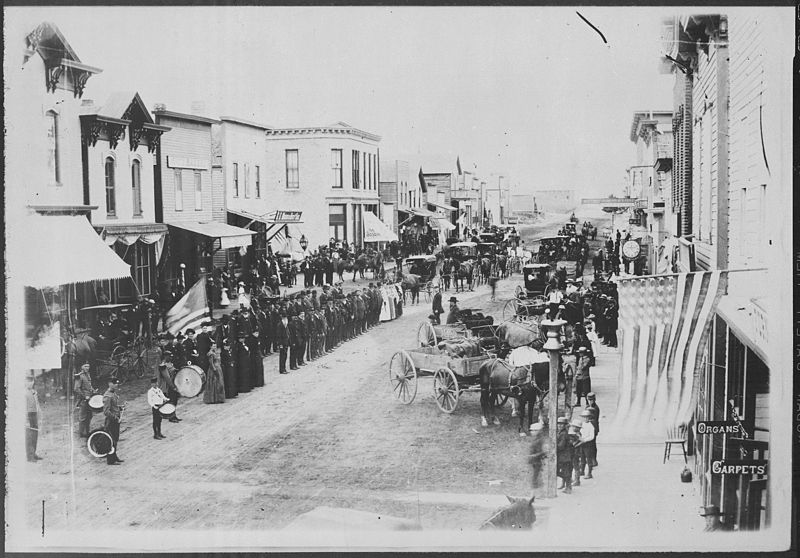
For a little while I had fancied having one of those wooden ammunition crates of my own. I think they lend a certain ambiance to a living history campsite, and after all there were plenty of these present in actual camps, as we have photo evidence to prove it.


There were always lots of these things laying around, stacked up in most cases, occasionally used as furniture.  It certainly looks better than lots of bulky objects draped with blankets or burlap bags.

I succeeded in making my ammo crate with the help of a downloadable PDF instruction guide from the 2nd North Carolina Mounted Infantry website, which can be obtained at this link. (rhetorical question--how is Mounted Infantry different from Cavalry? Judging by their photo they look just like regular cavalry. Hmm.)

For some people this is enough, but if you're like me and you need to see how to do things visually, then...this blog is for you.  I took a photo of each step in the box construction process and will illustrate my own walkthrough with these photos.

Ready to build?  Here goes!

First, you have to obtain the lumber you need to construct the box.  Being a handyman, I hoped my Dad would have all the scrap lumber I would ever need to build anything.  Well, he had everything except what I needed.  The instructions call for pine wood with a fairly straight grain and no knots, being easiest to cut.  Lumber at that time as far as I know would have been milled and machine cut anyway.  So if you live on the East coast, your best bet would be a big box home improvement store like Lowes or Home Depot.  The staff at these places of business are generally pleasant and helpful and you shouldn't have much trouble finding what you need.  These instructions call for certain widths and lengths of lumber, which the 2nd NCMI guide lists for us:

6 foot – 1x6 inch pine board
3 foot – 1x12 inch pine board
2 foot – 1x2 inch pine board

Now when I went to the store, being not as experienced in construction, I realized that you will never be able to find stock lumber with these measurements.  The boards were labeled "1x6" for example, but they weren't 1 inch by six inches!  They were always 3/4 of an inch by 5 and 3/4 inches.  I had a moment of illogical panic as I was trying to build this on Memorial Day weekend and all the real lumber yards were closed, so I couldn't get boards custom milled to these exact measurements.

But then somebody who wasn't clueless explained that these measurements are nominal measurements.  They refer to the size of the rough boards cut at the sawmill before they are planed down. It's an industry standard that I suppose existed in 1860's as well as now.

A table showing the nominal wood sizes and their actual sizes is below.

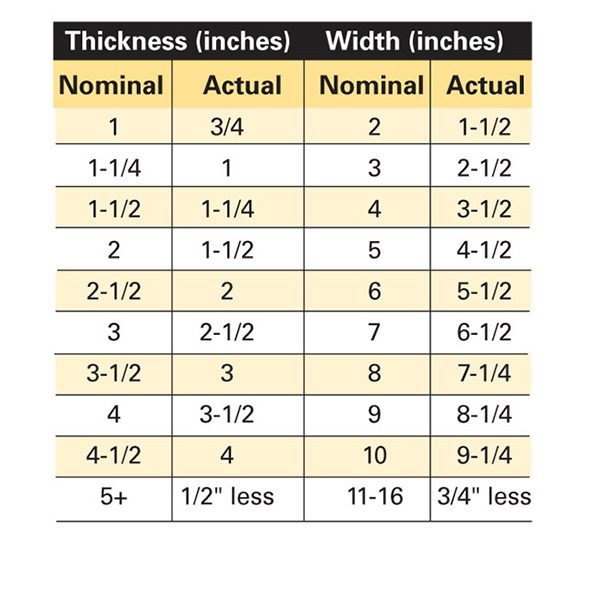
(thanks familyhandyman.com)

So for the not quite so handy, this means what we're looking for is 6 feet of 3/4" x 5-1/2" pine board, 3 feet of 3/4" x 11-1/4" pine board, and 2 feet of 3/4" x 1-1/2" pine board.  These are pretty standard sizes.  The only thing you'll have trouble with is getting that precise length.  Most stores only sell it in 6 foot, 12 foot and longer lengths.  Typically, if you ask, employees will generally be able to cut this to the desired length for free, making it easier to fit into your car and saving you money.  I ended up going to Lowe's and buying smooth, knot-free, high-quality lumber known as "Select Pine" and spent no more than 35 dollars on it.

Oh before I forget, here is a rough list of the tools you need.

- Claw hammer and finishing nails at least one inch long
- wood or rubber-headed mallet to bang some stuff together
- workbench vise (recommended but not required. I find it helps hold the box steady when I hammer or drive stuff into it)
- 6 slot-headed wood screws, about one inch in length
- 4 antique cut iron nails (can be found at antique stores--these are optional for added realism)
- Coping saw, small hand saw with a very thin fine toothed blade for trimming work
- larger wood hand saw, electric saber saw, or table saw for big straight cuts. Make sure the teeth are straight and in line so they don't rip the wood.
- chisel or big slot headed screwdriver to break off small pieces of wood
- electric or hand drill, with bits the same diameter as screw threads.

So once you have the boards and have gotten them into your garage, basement or work area, you cut each board to the determined number of pieces and lengths.  You could even have this done for you in the store, but I used a table saw.  I'd recommend doing it in the store.


Out of the 1x6 board, make two pieces 14 ¾ inches long and two pieces 10 ¾ inches long.  This should pretty much use up the 1x6 with one length remaining to make a new piece, should you mess up. (which I did)


From the 1x12 board, cut two pieces 14.75 inches by 10.75 inches. This will be the lid and bottom of the box.


Then, cut two pieces off the 1x6 the same length as the width of the box, 10 3/4 inches. These will be the end handles to pick up the box with.  Save the rest of that board for later.


Refer to Page 4 of the PDF for this next part. This will be the most time-consuming part of the whole box.

Then, you must cut joints on either end of each of the side boards so they fit together. I've seen some of these simply nailed  or glued together on the ends of the boards, but the accurate 1860s way to do it is a simplest dovetail joint. They mesh together like teeth or Waffle Blocks, if you remember those plastic things you or your kid played with as a toddler.  The best way to do this is draw the lines in pencil where you cut before cutting it.  Copy the design on page 4.  I found it helps to draw an "X" through or color in the chunks of wood to remove, because if you mix this up and cut out the wrong pieces, the boards won't fit together and you need to buy some more lumber and repeat the whole process.

Here's how I marked my boards once I got them cut down to size.


The X-ed out areas will help you, trust me.


The best tool to use for this next part was a special hand saw my Dad bought at a hobby store before they went out of business. You can see from the picture below it has a few different blades which screw on to the handle.  It even came with a tiny miter box! The blades are almost as thin as paper or thin cardboard, and have tiny, very fine teeth. I don't know what this saw is called, my guess is it was meant for sawing wood picture frames. But something similar to this will help you make the clean, smooth cuts you need with a minimum of filing or sanding afterward.

So,  next I clamped the first board in a vise  and began to carefully and slowly cut into the parts of the wood I had marked as "cut these parts away" with the frame saw. 

The way they probably did this was make a lot of cuts side by side into the area to be removed, so it ends up looking like a wooden comb... like so.

Then, take your chisel or big slot headed screwdriver and start pounding away on the handle to chip and break or pry off the comb pieces you just made.  This part isn't easy but it's the way it was done. Making more comb cuts closer together with the saw makes them thinner and easier to break off.

 When you're done doing this and cut the appropriate notches  (hopefully without slipping and hurting yourself) you should have quite a bit of these small wafer-like pieces of wood.  Hold on to these and don't throw them out just yet. You'll see why later.


Then  when you get the first cutaway done, depending on how good a job you did breaking off the comb, you may have a very rough splintery cut like this one below.  I almost guarantee it won't be smooth.


This can be easily fixed by using a rough or coarse wood file and rubbing it back and forth vigorously to smooth it out (don't get too excited now).

 When you finish it should be much smoother. be sure you don't shave off too much of the wood or it could widen the gap and make the sides of the box not fit together as well. You should have a nice clean cut like this one below.


 Then, repeat this process another 13 times until you have the toothed joints the pattern calls for. This took me a good couple hours to do, and my hands got so tired from all that sawing, hammering and filing I had to take a break.  This part is the hardest part without a doubt.  I can't imagine getting paid one nickel an hour or less to make dozens of these boxes in a woodworking shop, but I'm sure people did that for the Army.


Congratulations. You just taught yourself how to make homemade Waffle Blocks out of wood for your kids!  

(Here's a visual of what Waffleblocks are. Little Tikes used to make them out of molded plastic, I dunno if they still do. I used to build stuff with them a long time ago.)  


...Okay, after you pulled all the splinters out of your hands and took a break, maybe to go dig out and play with your Waffle Blocks... now for the really fun part--fitting the walls of the box together.


I almost guarantee that no matter how well you think you measured or traced those teeth and carefully cut them out, they won't fit together as neatly and perfectly as you'd hoped.  In my case I had gotten a little carried away with the filing down, and made the gaps between the teeth too big. So when I fit the corners together they would leak like a sieve.

Remember the wood chips I told you to save? This is where I found they come in handy!  Use them as little wedges to fill in the gaps. You should have a lot of sizes to choose from, thick and thin ones. This is a byproduct of the chipping process. Pound them in with the rubber or wood mallet until they're flush.


After you do this, you'll find out your box corners will be very strong and probably won't need glue or nails to hold together.  This is true resourcefulness which our 1860s ancestors would have no doubt used whenever they could. Remember they threw nothing away, only recycled if they could help it!  I imagine that even the sawdust from cutting the boards would be used as packing material for shipping other items.


 I was able to get some of the other corners to fit better by rotating the pieces until they worked, since every joint fit together differently.  When I found a corner that worked well, I marked it with a number, like so.


Okay, so after hopefully a minimum amount of cursing and bashing your fingers with the mallet, you should have a neat box with tight-fitting corner joints. If you're worried about them splitting you can hammer in 2 or 3 finishing nails to the edges of the joints to hold them. I wouldn't recommend wood glue or screws because the glue makes a mess and the screws could splinter your nice knotless pine wood.


Now boys and girls, it's time to assemble the box. The last thing you should hopefully have to cut if you did all this right are the handles.  This is where the rest of the 1x6 board comes in.  Cut two lengths of it the same length as the short sides of your box. If you look at the photos they go all the way across. To avoid snagging your expensive wool pant legs on these, everybody recommends beveling the small ends of these simple handles at no less than 20 degrees and no more than 45 degree angles.  There are various ways to do this, you could use a miter box or a chop saw, or a table saw with a variable-angle blade if you have one. You can use a hand saw too but I almost guarantee you won't cut straight or level. Every time I used a hand saw to cut this wood it didn't come out square.

This guy's walkthrough said to attach the handles with screws countersunk into the wood, but the best way to do it is with finishing nails hammered flush with the surface. Put something like 4 finishing nails, evenly spaced, across the handles. Hammer them in gently with the claw hammer.


So then the next step is attaching the bottom floor to your box. Take one of the roughly 10 x 14 inch pieces and line it up on the bottom of the box after you flip it upside down. It probably won't be the perfect dimensions you thought, so you may need to trim off a bit from the edges.  It should be flush with the bottom edge of the side walls.  A finishing nail in each corner should do the trick. If you fid out the bottom of the box is slightly warped which could happen (it did to me) put 2 or three nails in each corner. Hammer them in at a slight angle to make them grip tighter and not pop back out.

 The heads of these nails should not poke out and will be easily painted over. no one will ever know they are there unless you tell them.

 Alright! so flip it back over and you have yourself a neat box without a lid.  Now to make the lid.
Ammo box lids were tightly screwed on and not nailed on to prevent tampering or sabotage, most likely. When the time came to open them once they were delivered to the field, someone would have the appropriate tools to open them.  They also had to be sealed tightly to prevent the cartridges and gunpowder from getting wet.  We will probably want to get into our ammo boxes, because we will keep our gun cleaning kits or drink bottles or cell phones, flashlights and whatever else in them.  So now we will follow the instructions on the page below, for making the lid.  Notice the shaded areas are where you attach the blocks of wood to the underside, to keep the lid from sliding off the box. The blocks say they are 1 and 3/4 inches by 9 and 1/4 inches on the drawing, but for the best fit, measure the inside of your box. I attached these with finishing nails which weren't long enough to go through the top of the lid but long enough to hold them on. This is the inside which in most cases we don't let the public see, unless you plan on putting real packed cartridges in this thing.


 For added realism, make the box lid look like it's screwed on by driving in slot-headed screws with flat tops, not round ones, and make the tops of the screws flat against the surface. Then, flip the box over and saw off the protruding threads of the screws with a hacksaw. If you don't have a way to cut the screw tips off, you can alternately pound the lid on with the mallet, then pry it off again with the claw hammer and you will have neat little holes poked into the tops of the box walls where the screws went in.  Enlarge these holes with a slightly bigger drill bit, and then the screws will sink into them when you replace the lid, further helping the lid to stay on and aligning it properly.

Note: use SLOT HEAD screws, because PHILIPS HEAD screws weren't patented until the 20th century! Henry F. Philips, the man this hardware is named after, wasn't even born until 1890! Don't believe me? Look it up.  Philips head screws weren't seen in anything until the early 1940's. The design was patented between 1935 and 1937.

I used some old 3/4 inch long slotted screws that were rusty. This will make it look like the box wasn't built yesterday and has maybe seen some exposure to the weather from outside storage.

 
If you did everything right, the lid should drop in and be just snug enough not to fall off. It may slip around a little, this is okay.  
   
HUZZAH! the box is done.

Now if you're a Yank like me, you want to paint your box.  I found examples of boxes that weren't painted inside, or given a coat of white primer inside, or painted one color inside and out.  I'm painting this one my favorite color: Army Green.  For this, I recycled an old paint mixture I had left over from reconditioning a World War II soldier's foot locker.  Who knows if it's the right shade of green, it looks like it could be. If it turns out to be wrong I can always mix up a new batch. No big deal.  The original paint has no doubt faded on the real cartridge crates; I imagine it was originally darker green.

I used a quick-drying paint that was ready to be handled in about an hour. Also bought at Lowe's.

 Then for the final finishing touch.  I had a handful of cut nails from somewhere in the basement.  These are the oldest kind of nails used to hold wood things together. They date back to colonial times and are made of iron.  Who knows where these nails came from.  Maybe they were from my Grandma's house which dated back to 1837.  Maybe they were my great-great grandpa's nails.  who knows.  They can be bought at reenactment sutlers, or if you get lucky an antique shop that sells really old tools.


 The 1861 ordnance manuals say that the handles of wood ammo crates are held on by two of these heavy iron nails, clinched on the inside of the box.  Now from past experience working with these nails, I know they have no point at all to them and on top of that are wedge-shaped, and will split your wood right in half if you pound 'em straight in.

So I relieved the strain on the wood first by pre-drilling holes with a drill bit almost as wide as the nail in diameter, maybe an eighth to a quarter of an inch thinner.  After doing this the cut nails slid right into the box handles and looked really good.


Your box is DONE! 

Now go have a cold beer and figure out what sort of things you can put in this handy dandy box. I plan to use it for my gun cleaning supplies, modern camera or drink bottles or whatever else will fit in it.

Stenciling the letters on will come next, as soon as I obtain a stencil.

Not bad for my first try. It's not totally and perfectly square, but I think the rougher you make things the better. They didn't have lasers or computer blueprints to measure these things with.  This is a rare hobby where if it looks hand made, you did it right. The rougher the better.

All in all this project took me about two days to make. And this post took a good three or four hours to write.  Few things beat the satisfaction of knowing you made something yourself. I think it was time well spent.

Tuesday, May 29, 2012

25 Things readers probably don't know about me.

 In the same vein as one of Stephanie Ann's posts of the much-borrowed "25 things about you" on her own blog, Which by the way you should really visit :)  I decided to reveal some unusual trivia about myself or where I come from. While I cannot promise that it will be 25 items long, or that I can write all of it in one sitting, some things will be sure to make you say, "Hmm..."

I'll try to keep it relevant to the historical time period I portray, but certain amusing anecdotes are sure to creep in from other areas of my life.  Enjoy.

1. I am still 100% convinced I was a soldier in at least one past life.  As a very young toddler I would tell stories about "When I was in the Army" before I even knew what the Army was.

2. My first trip to Gettysburg was in 1989. I was 5 years old.  After returning from the trip I impressed my kindergarten class with a small oratory on Pickett's Charge.  The teacher wrote my Mom a note and asked how I knew so much about the battle.  My most vivid memories of that trip were the old visitor center and cyclorama, the electronic map, the audio driving tour (which I still have the cassette tape of somewhere), my 3 year old brother tripping and getting "wounded" at Devil's Den, and a very creepy wax museum somewhere in town.  Among the mementos I have from that first trip is a small cast iron and bronze cannon which still sits on my desk.

3. Prior to becoming a Civil War reenactor, I had never even shot a rifle before. I had held my cousin Billy's musket and practiced drilling with it, but my School of the Soldier in April of last year was the first time I had ever fired a rifle. (I don't think grandma's .22 really counts as a rifle, it's more of a toy)

4. The first Civil War reenactment my family took me to was the 131st Battle of Chancellorsville, reenacted in Delaware for some reason at Brandywine Creek State Park.  It was Memorial Day weekend, May 28-29, 1994.  I recently came across the brochure from it and it lists my old regiment, the 2nd Delaware Infantry, as being involved in the event.  At that time the regiment was split into at least 4 different companies, company A and company C being in attendance. There was also a 1st Delaware which no longer exists, and both were part of a "Smyth's Brigade", which no longer exists.  The 20th Maine, which I fought alongside last year at many battles, was still in Vincent's Brigade as it is today.

I still have a set of plastic Blue & Gray toy soldiers I bought at a sutler from that battle. I think my brother bought a pennywhistle there which didn't survive, being made of some flimsy aluminum.  For a snack we bought some vintage 1860's  "Sarsaparilla" (pronounced SASS-farilla) that came in brown glass bottles with swing tops.  Does nobody make this stuff anymore? It was really good, like the best birch beer I ever tasted.

5. I wanted to be a Union soldier at least two years of my life for Halloween. I have pictures of both my brother and I posing in our home-made costumes.  I must have been about 10 years old.  Being a reenactor now, I find it hilarious how wrong the costumes were. The chevrons are upside down and yellow instead of blue, the coats Mom made had four pockets on the outside like WWII jackets, we're wearing the fake Gettysburg hats with the crossed rifles, and I have a red stripe sewn on to my jeans.  We are both holding flintlock toy pirate pistols and plastic sabers.  Any modern reenactor would consider this a blackmail photo and call me the "farbyest" guy alive. But it's still cute I guess.

6.  I have a cousin named Bill Stephey who is a reenactor. He is the guy who inspired me to do this.

Bill has worked as a history interpreter at Fort Delaware, and reenacts not only Civil War, but Revolutionary War and Medieval periods also.  He led the paranormal investigative team at Fort Delaware up until recently.  He has inherited his father's collection of vintage rifles and pistols, and owns a small museum's worth of militaria from just about every American war ever fought.  Bill has the equipment to be a soldier from every rank of Infantry in the Union army, from enlisted man to NCO right up to an officer. He can portray a Cavalryman or Artilelryman as well, and a Chaplain, Surgeon or just about any other role relevant to the period.  He's a very high-level Freemason and is allowed to wear Masonic decorations on his uniform.  He also sails on the Kalmar Nyckel, a replica of the ship which bought the first Dutch settlers to Wilmington in the 1600's.  All around very cool guy, you have to meet him to fully grasp how crazy he is about history and war relics.  I guess you could say he's my role model?
I could go on about his background and credentials, quite a character. But this is about me so...

7. Prior to last year, I didn't ever picture myself as being a reenactor.  I also didn't think I would ever be strong enough to do it. I guess I have proved myself wrong.

8. What got me interested in reenacting again was attending a Rev War recreation of the "Battle of the Brandywine" at the same site the 1994 reenactment was held near my house.  This was in September 2010.  I didn't know this at the time, but my Civil War "cousin" Stephanie Ann was there. She also does Colonial events.  It was there I spoke to a few groups about actually becoming a reenactor. I almost became a Revy War guy, folks!  I decided on Civil War because it was a lot cheaper.

9. I am the "Jonah" of whatever group I'm with.  I seem to be bad luck.  Every battle I fight in, something bad happens to me or a friend I am with at the time.  I have a story from every event last year, most of them are funny. Like at Spotsylvania, my shoes fell apart and I had leave the event to find a hardware store so I could glue them back together.  At the 150th Manassas/Bull Run I was being evacuated from the event for heat stroke, and the golf cart I was riding in almost flipped over into a ditch.

10.  I only became a reenactor because they won't let me do the real thing.  If you know me, it's no big secret that I speak, act and dress like a soldier a lot of the time.  I wanted to join the real military ever since I was a little kid.  Now I guess I'm glad I didn't, because for me joining the modern US Army or Marine Corps would be suicide.  Reenacting is how I chose to honor my ancestors who fought real wars for this country. And at least nobody can force you to out of service due to health or old age. Reenactors are lifers.
 
11.  I tried to enlist in the Air Force Reserves this year, and was rejected on medical grounds.  The medical staff at the recruitment office said, and I quote: "Kid, you better stick to reenacting."

12. I have 5 relatives or ancestors I know of that were involved in the Civil War.  One was an Infantry soldier and the other four were musicians.  All of them were German-speaking immigrants who served together in the same Union infantry, the 21st New York, Company K.  They were all Yankees, and I do this partly to honor them, see how they lived and pay tribute to my own heritage.  Switching sides to Confederate to me would be no better than spitting on their graves.  I'm a Yankee to the core.  Love me or shoot at me, it's up to you.

13.  I have to miss out on a lot of battles because I can't go to them alone.  I'm not a very good driver.  I have a car my family lets me drive, but I tend to get distracted or almost fall asleep at the wheel on long road trips.  The longest trip I seem to be able to handle is from my house to the Delaware beaches, which is about two hours.  I have trouble focusing on the road and miss turns and exits often.  This is even worse when I don't get enough sleep, which I never do when I'm camping.  If I had to I could probably drive out to Gettysburg on a good day, but I'd have trouble coming home.

14. I am a horrible insomniac.  I was born with a cyst on my pineal gland, which regulates day and night cycles in a normal human being.  This means that 4 hours of sleep is about normal for me, and six hours only happens if I work myself half to death.  I can actually "forget to sleep" and stay up all night without any effort.  This was true even in my infancy.

Most Friday and Saturday nights at reenactments are spent tending the campfires, standing guard on all-night sentry duty, or wandering the company street like a lost soul until dawn.  The Surgeons detected my brain cyst about three years ago, when I was getting surgery done on another part of my head. We think it might be inoperable. So I just have to live with the fact that I will never get enough sleep to function properly.

The only advantages to this is are in my lifetime I have witnessed hundreds of the most gorgeous sunrises you can't even imagine.  And I will always be alert at night and the first one to arms if the camp ever gets ambushed. :)

15. I like camping even though I never sleep enough.  I just like being outside in all kinds of weather.  Part of that was why reenacting appealed to me.

16. I have enough scars on my body, either from surgery or from injuries, to look like I have been through an actual war.  My favorite on is the 2 inch biopsy incision on my left bicep. It really looks like a knife wound that healed.

17. I am one of the few reenactors I have encountered who is skinny enough to pass for a convincing soldier of the 1860s.  I have a lot of vitamin deficiencies, very thin hair, and bad teeth.  I am strikingly tall, but not in an unheard-of way for a soldier.  I am convinced that if I ever become one of those ubiquitous TBGs (tubby bearded guys) in the future, it will be time to quit reenacting.

18. I'm glad that pets aren't allowed at most reenactments, because I am afraid of most dogs.  I don't mind being around horses though and otherwise like animals a lot.  I don't think the "old army mule" gets represented at reenactments.  In the infantry mules were the beasts of burden and did all the work, horses if I'm not mistaken were saved for cavalry fighting.

19. I find myself wishing reenactments were more realistic sometimes. I want to actually march into a field with clouds of dust explosions representing cannon shell bursts.  I also want to ride a horse wagon into a campground from the parking area, not a bus.  Maybe once in a while, company cooks could slip a laxative into the food just so we could get to experience being horribly sick in camp for one night.  I think all reenactors are a bit masochistic when it comes to this. I've met people far worse than I am.

20. I think I'm unusually clean for a reenactor.  I take a change of modern civvy clothes to get into so I don't have to ride home and enter rest stops or restaurants in my filthy sweaty uniform. I also bring old towels and washcloths to sponge myself off after exerting myself in battle. I typically bring an extra shirt to put on so I can hang up the other one to dry on a tent rope.  Most of the places we go are very sunny and windy, you'd be surprised how quickly your stuff dries out if you hang it up.

21. I have an electrolyte problem and poorly functioning kidneys, which means I have to carry at least a bottle of Gatorade or extra Smart Water in my haversack at all times. I recently found these dissolving Gatorade tablets you can drop into a water bottle and within a minute you have Gatorade. I found this saves a lot of space. The tablets come in a little container no bigger than a shotgun shell.

22. Really, I have a lot of health concerns that I think would prevent most people from reenacting. But I do it anyway. I like to tough things out.  I still like to believe that it's making me stronger and I should keep doing this.

23. If my muscles are sore after a reenactment or a parade, I found that laying down and resting for a day doesn't help.  It only makes me hurt more.  If I go out jogging or exercise, it makes a lot of my aches go away. My legs hurt a lot this morning, but after a run around the yard they didn't hurt anymore.  With my degenerative bone and muscle conditions (which a Civil War veteran would probably consider "rheumatic") it does more damage if I'm inactive for my recovery, because my bones lose strength and my muscles start to atrophy.  Part of this could be due to my high metabolism.  I find it's better for me to stay in motion to keep myself conditioned.

24. I eat like a pig and yet can't seem to retain any nutrients.  I bet most reenactors might be silently jealous that they can't look as fit as I am.  I'm really not as healthy as I look but it doesn't matter.

25.  I have always been known to tough it out and not complain if I'm really overexerting myself.  If I start acting illogical or dopey or slow, give me some food!! general rule to follow.  If i have any trouble keeping up with my comrades, I won't make it obvious.

History of Memorial Day

[Note: I did not write this.  It was a post by an anonymous user in one of my WW2 forums.  As soon as I find the actual author I will give due credit --Editor.]

Memorial Day History

Three years after the Civil War ended, on May 5, 1868, the head of an
organization of Union veterans — the Grand Army of the Republic (GAR) — established Decoration Day as a time for the nation to decorate the graves of the
war dead with flowers.
Maj. Gen. John A. Logan declared that Decoration Day should be observed on May 30. It is believed that date was chosen because  flowers would be in bloom all over the country.  
The first large observance was held that year at Arlington National Cemetery, across the Potomac River from Washington, D.C.  The ceremonies centered around the mourning-draped veranda of the Arlington mansion, once the home of Gen. Robert E. Lee. Various Washington officials, including Gen. and Mrs. Ulysses S. Grant, presided over the ceremonies.  
After speeches, children from the Soldiers’ and Sailors’ Orphan Home and members of the GAR made their way through the cemetery, strewing flowers on both Union and Confederate graves, reciting prayers and singing hymns.  
Local Observances Claim To Be First 
Local springtime tributes to the Civil War dead already had been held in various places. 
One of the first occurred in Columbus, Miss., April 25, 1866, when a group of women visited a cemetery to decorate the graves of Confederate soldiers who had fallen in battle
at Shiloh. Nearby were the graves of Union soldiers, neglected because they were the enemy. Disturbed at the sight of the bare graves, the women placed some of their flowers on those graves, as well.  
Today, cities in the North and the South claim to be the birthplace of Memorial Day in 1866. Both Macon and Columbus, Ga., claim the title, as well as Richmond, Va. The village of Boalsburg, Pa., claims it began there two years earlier. A stone in a Carbondale, Illinois cemetery carries the statement that the first Decoration Day ceremony took place there on April 29, 1866.  
Carbondale was the wartime home of Gen. Logan. Approximately 25 places have been named in connection with the origin of Memorial Day, many of them in the South where most of the war dead were buried.  
Official Birthplace Declared In 1966 
Congress and President Lyndon Johnson declared Waterloo, N.Y., the “birthplace” of Memorial Day. There, a ceremony on May 5, 1866, honored local veterans who had fought in the Civil War. Businesses closed and residents flew flags at half-staff. Supporters of Waterloo’s claim say earlier observances in other places were either
informal, not community-wide or one-time events.  
By the end of the 19th century, Memorial Day ceremonies were being held on May 30 throughout the nation. State legislatures passed proclamations designating the day, and the Army and Navy adopted regulations for proper observance at their facilities.  
It was not until after World War I, however, that the day was expanded to honor those who have died in all American wars. In 1971, Memorial Day was declared a national holiday by an act of Congress, though it is still often called Decoration Day. It was then also placed on the last Monday in May, as were some other federal holidays.  
Some States Have Confederate Observances 
Many Southern states also have their own days for honoring the Confederate dead. Mississippi celebrates Confederate Memorial Day on the last Monday of April, Alabama on the fourth Monday of April, and Georgia on April 26. North and South Carolina observe it on May 10, Louisiana on June 3, and Tennessee calls that date Confederate
Decoration Day. Texas celebrates Confederate Heroes Day January 19 and
Virginia calls the last Monday in May Confederate Memorial Day.  
General Logan’s order for his posts to decorate graves in 1868 “with the choicest flowers of springtime” urged: “We should guard their graves with sacred vigilance. ... Let pleasant paths invite the coming and going of reverent visitors and fond mourners. Let no neglect, no ravages of time, testify to the present or to the coming generations that we have forgotten as a people the cost of a free and undivided republic.” 
The crowd attending the first Memorial Day ceremony at Arlington National Cemetery was approximately the same size as those that attend today’s observance, about 5,000 people. Then, as now, small American flags were placed on each grave — a tradition followed at many national cemeteries today. In recent years, the custom has grown in many families to decorate the graves of all departed loved ones.  
The origins of special services to honor those who die in war can be found in antiquity. The Athenian leader Pericles offered a tribute to the fallen heroes of the Peloponnesian War over 24 centuries ago that could be applied today to the 1.1 million Americans who have died in the nation’s wars: “Not only are they commemorated by columns and inscriptions, but there dwells also an unwritten memorial of them, graven not on stone but in the hearts of men.”  
To ensure the sacrifices of America ’s fallen heroes are never forgotten, in December 2000, the U.S. Congress passed and the president signed into law “The National Moment of Remembrance Act,” P.L. 106-579, creating the White House Commission on the National Moment of Remembrance. The commission’s charter is to “encourage the people of the United States to give something back to their country, which provides them so much freedom and opportunity” by encouraging and coordinating commemorations in the United States of Memorial Day, and the National Moment of Remembrance.  
The National Moment of Remembrance encourages all Americans to pause
wherever they are at 3 p.m. local time on Memorial Day for a minute of silence to
remember and honor those who have died in service to the nation. As Moment
of Remembrance founder Carmella LaSpada states: “It’s a way we can all
help put the memorial back in Memorial Day.”

Some vintage photographs of Decoration Day (pre-WW1) that feature living Civil War veterans.

Civil War Veterans, Fourth of July or Decoration Day, Ortonville, Minnesota.  ca. 1880

Source: Wikipedia 

Members of R.M. Starring Post, G.A.R. (Below) Taken Decoration Day 1895 (Silver Creek Civil War Veterans).  This photo was in the Silver Creek News and Time, May 21, 1936.  Veterans are Left to Right-- Joe Andrus, Ira D. Rowley, Michigan Man , cousin of S. S. Starring; S.S. Starring, Dan Whaley,  J. W. Patterson, O.Lee Swift, Sid Crocker, Wm.H. Bartlett, James Duffy, John Dalrymple, Tom Roberts, Paul Everts, Chester Bradley, C. A. Rugg, George Dyer.

[Ed: I think it's very cool that someone identified all the veterans in this photo, especially since now everyone who would have known them is dead. Many photographs of people are not labeled and so the identities of men are lost forever.]

Source: (http://www.silvercreekny.com/military_history_page.htm)

(Below) Decoration Day 1889.  I do not know where this photo was taken, it appears to be in a school judging by the chalkboards. That is a lot of flowers. Perhaps they were brought in by the children.  (Source: History.com)

Gaither, AR Cemetery - Decorations Day - Civil War Veterans  ca. 1910

 Source: http://www.ancientfaces.com/research/photo/395220

Decoration Day celebration in Manila, taken May 30th, 1899

Source: Unknown

Friday, May 25, 2012

Reenactors, It's okay to be hot and dirty once in a while.

...Readers, now that I got your attention with that wrongfully suggestive headline, you may get your mind out of the gutter and learn why I would make such a statement. 

When we are at events to which we are invited, I get tired of being asked questions like "aren't you hot in all that?" As if that question even needs to be asked, while we stand there with streams of sweat running down our faces like tears from underneath our hats.

I think one of the hardest things for spectators and newbie reenactors to understand is that we are supposed to sweat.  We are supposed to look tired and dirty and smell funny. 

I know in our modern antiseptic society that floods our senses with commercials for disinfectants, hair shampoos, body wash, soaps, toothpastes and laundry detergents, and exotic fragrances for both men and women, personal hygiene is very important.  The idea of why anyone would want to go several days without a shower and that luxuriant, shining and bouncy hair to accentuate our polished squeaky clean skin seems barbaric.  And like any other fella, I know that a very long shower after coming home from a particularly hot, muddy or dusty camping event and laying in soft bedsheets and clean cotton clothes feels like nirvana, don't get me wrong.

But when we're out there sleeping in piles of straw or on the wet ground, burning in the hot sun without shade, or running around and shooting at each other; dressed very inappropriately and pretending to live over a hundred fifty years ago, it's a different world entirely.

In that world, it's okay to be dirty.

The obvious answer to the dumb question "are you hot in those clothes?" is yes.  But it goes deeper than that.  Instead of simply stating "Um, well, yeah" and moving on, we can engage the inquisitive spectator and tell them why we dress like that.

Yes, we are supposed to feel hot and sweat profusely while doing the stuff we do, walking and running around outside in clothes made of layers of muslin and wool.  There good reasons why people wore such heavy and restrictive clothing.  First, it was the most durable and still flexible material available for clothes at the time.  Second, wool was good to wear outside, because it is naturally water repellent.  Ever notice how if you spill a few drops of water on fuzzy wool, it slides right off and won't soak in, and you can just wipe it off the surface?  Soldiers liked it because it was fire retardant. Wool smolders slowly, but is much more difficult to burn. It's very warm and insulating in the winter.  (The great coats we wear are very cozy on cold windy days!)   And in the summertime it makes you sweat which--like it or not-- is the body's natural way of cooling itself.  When wool gets waterlogged, it becomes very heavy, but also stays cool and moist for a long time without evaporating.  So when we put on our gear and start to sweat, it saturates the inner lining of the coat or vest and hugs the shirt closer to our bodies, and for awhile we feel disgusting.  But as we walk around in it, and really once a light breeze kicks up, something magic happens.  We start to cool down.  Unbuttoning our coats lets this rush of air hit the wet garment, and within seconds we feel relief. Our fluid cycle becomes a natural cooling system. 


Another question spectators have is, why don't we expose more of our skin? Notice women cover everything but their heads, and even then many wear hats. Their outfits are always long-sleeved. There are several reasons why. One was modesty. The low necklines, knickers and bare forearms of the previous century were looked upon as decadent, this was a much more conservative time. Women on the whole wanted to look plain, and not draw attention to their bodies. They also had an understanding that water exchange in the body was a cycle. Perspiration was as necessary and involuntary as breathing. If you were in the sun with exposed skin for too long, you would stop sweating and faint. So thus, they believed not bundling up even in hot weather would "hinder perspiration" and make you sick. It was thought to be a cause of pneumonia; not wearing enough clothing.

Last year, I volunteered as a reenactor guarding Fort Delaware. This was about a week before the 150th Manassas and it was over 100 degrees. The first question the uniformed tour guide asked his group (with a look of astonishment) was: "Were you all robbed? What happened to all your clothes?" A hoop-skirted lady asked a teenage girl: "But look at all that exposed skin. Are you ill? Aren't you afraid you'll die?"

Sounds crazy if you're not one of us, I know.  But it makes sense. Sort of.


It has to be understood how people lived in past centuries to appreciate how attitudes may have been different towards personal hygiene. People did bathe and wash their clothes less in the 19th century (A primary source cited in World Turn'd Upside Down recommends women change their stockings twice a week as if that were a novel concept!) but there were reasons why.

People worked much harder physically and for longer hours, in most cases without the aid of labor-saving machines. They did most of their work outside in the elements, or inside spaces with inadequate air circulation.  They also spent much more time around heat sources like an open fire, for the necessity of cooking. In general, people were much more used to being hot all the time.  The amount of physical labor that even civilians would have to do each day would seem exhausting by today's standards. They were considerably more acclimated to it than we are.

Cleaning and washing clothes was very hard work, and when done for many people, it could be a full day's job.  A living historian at Fort Delaware portraying a laundress shows how much work was involved.  She has to bring water in buckets from a well underneath the fort to fill a large washbasin; if she is trying to boil shirts to remove lice it must be heated slowly over a fire.  She has to remove all buttons from the shirts, because scrubbing them on a washboard will tend to break the buttons.  Once the shirts have been stewed in hot water they are put into cold water, and scrubbed against the rough corrugated surface known as a washboard.  Then they must be wrung out and hung up to dry on a rope with wooden clothespins.  When the shirts are dry she has to sew the buttons back on. That was easily a full-time job, working dawn to dusk. Think about how many dirty, sweaty men were in the fort.

Farmers and people who weren't wealthy would probably wear the same work clothes every day until they fell apart, and even then, they would be mended, darned and patched to keep them going as long as possible. 19th century America was not a throw-away society.

Tuesday, May 22, 2012

The Bullet Never Fired


"VMI cadet Charles H. Read, Jr., a Private of C Company class of 1867, was carrying this Austrian-made Lorenz musket you see here early on the morning of May 15, 1864, when the Confederate line crossed over the top of Shirley's Hill at the battle of New Market, before their heroic charge across the "field of lost shoes."

 Before he had a chance to fire at the Union soldiers, Cadet Read and his musket were struck by an artillery fragment. [bending the barrel of his musket back on itself in an impossible fashion] The useless musket was taken home by Cadet Read with its unused powder and bullet lodged in the barrel. The unfired .54 caliber Minie ball was forgotten for 135 years until it was discovered during a safety check and removed in 1999."

Can you even imagine the tremendous explosive force required to warp a solid steel rifle barrel away from its stock and bend it back on itself at a 90 degree angle? Even more incredibly, the kid lived!


Monday, May 21, 2012

The 19th Century Gun Cleaning Post (revised and still in progress)

As re-enactors and not real soldiers, we want to take better care of our guns and really pay close attention to cleaning them more properly than a soldier would in the field, for several important reasons:

1) There's a big difference between the cleaning we do at an event, known as a "quick and dirty field cleaning", and the more involved cleaning we do at home afterward. The Quick and Dirty method gets the gun ready to fire again for tomorrow's battle, but would ruin it if you left it that way for the next event some months later. The more thorough cleaning is meant to "winterize" the gun for long term storage and non use until next season.

2) A fully "de-farbed" Civil War rifle can cost up to $1200, with even the cheapest ones running about $695. This stuff ain't cheap. Reproductions are costly and this is an expensive hobby. Weapons with brass fittings and wooden stocks are much harder to clean too because acceptable gunpowder solvents like hot water or bore cleaner clean the barrel but eat away at wood finishes and tarnish or rust the brass.

3) Our guns have to last a lifetime. A soldier's gun only had to last until he could replace it with another one picked up off the field or was issued a new one by the US government. Reenactors have to have guns that shoot reliably for twenty, thirty or even forty years. A reenactor's gun is his lifelong friend.

4) It's much harder to clear obstructions from the barrel of a muzzle loader. Try pulling out your ramrod after it gets stuck because you put the wrong kind of brush on it. Almost impossible :P If the powder plug at the bottom gets bad enough the gun may be useless.

5) Loose black powder does cause really bad fouling inside the barrel. It helps to shoot a few live rounds on the range once in a while to clean out the rifle grooves and keep them sharp.

6) During the real Civil War soldiers had to clean their guns a lot less often than we do now. Every cartridge box was issued pre-loaded with at least forty rounds, and of those I think every fifth bullet they shot was known as a Williams "Cleaner Round", that was a bit wider and expanded more when fired, scraping out the barrel as it went. So when they fired live minie balls in combat the muskets were actually self-cleaning.

7) Long muzzle loading rifles are much harder to clean properly. They don't come apart into lots of pieces like an M1 Garand does. Most guys who try to take apart their guns for "cleaning" (and aren't professional 19th century gunsmiths) quickly realize it's almost impossible to put the lock mechanism back together with modern tools.
If you want to take apart that percussion hammer and lock "just to see how it works" and try to reassemble it, then you'd better sell tickets-- because you won't get it back together by yourself, and believe me, a lot of people will pay to watch you try!

While we're on the subject, I found an 1896 edition of Harper's Weekly magazine with an article that details proper care of muzzle-loading hunting rifles. Which I will reproduce here. Who better to turn to for advice than people who lived in the 19th century and were the authority on cleaning black powder firearms?

Enjoy and take heed.

THE CARE OF A GUN.
BY H. H. Benson

reproduced from Harper's Round Table. New York, Tuesday, March 3, 1896. Vol. XVII.-No 853.

Aside from the pride and satisfaction which every sportsman should take in keeping his favorite weapon bright and free from spots, inside and out, it pays to keep a gun clean. The residue left in the barrel after firing contains acids, which will soon eat "pits" or spots in the metal, and when once started, it is almost impossible to prevent them increasing in size and number. When badly pitted, the recoil is increased by the roughness in the barrel. A gun can be cleaned by the following directions.

The cleaning-rod should have at least three tools-- a wool swab, a wire scratch-brush, and a wiper to run rags through. Have plenty of water at hand--warm if you have it, if not cold will do nicely [EDITOR'S NOTE: We now know that steaming water just under boiling works best, because it heats and loosens the powder with a solvent effect and also quickly evaporates. Use hot water] Affix the swab on the end of the cleaning-rod, and then some water in a tin basin or wooden pail. By placing one end of the barrel in the water, you can pump it up and down with the suction of the swab. [EDITOR: This sounds interesting. Never thought of doing it that way. Barrel must be removed first of course] When swab becomes discolored take fresh water, squeeze out the swab in it, and repeat the operation, until the water comes from the barrel as clear as it went in. If the gun has stood overnight, or longer, since using, it is best to put on the scratch-brush after the first swabbing, and a few passes with this will remove any hardened powder or leading. The next step is to fill the wiper with woollen or cotton rags, and dry the barrel thoroughly. When one set becomes wet take another, until they come from the barrel perfectly dry.

Then stand the barrel on end on a heated stove, changing it from end to end, taking care that it does not become overheated. By the time it is well warmed-up, the hot air from the stove will have dried out every particle of moisture left in the barrel. If no stove is at hand, the last set of drying rags used must be plied vigorously up and down the barrel until it becomes quite warm from the friction. Drying is the most important part of cleaning, and if the least particle of moisture is left in the barrel it will be a rust spot the next time the gun is taken from its case. The gun may now be oiled, inside and out, with sewing-machine oil or gun grease, which can be had in any gun-store. The woollen rags used for greasing soak up a great deal of oil, and should be dropped into the gun cover for future use. [ED: Note how you throw nothing away after the cleaning, everything is/can/should be recycled]


In regard to the safe handling of guns, almost all rules centre in that of always carrying the gun in such a way that if it should be accidentally discharged it would do no harm. If this rule is borne in mind, and strictly obeyed in the beginning, it becomes a habit, and is followed intuitively. The gun may be carried safely on either shoulder, or in the hollow of either arm, with a sharp upward slant. A breech-loader is so easily unloaded that there is no excuse for getting into a wagon or boat, or going around a house, without unloading. Never hand a loaded gun to anyone who asks to look at it. Whenever you pick up any kind of a gun to examine it, always open the breech and see if it is loaded, and the habit will grow so that you will do this almost without knowing it. It seems needless to say that you never pull a gun toward you by the muzzle through a fence or out of a boat or a wagon, yet the violation of this rule is the cause of more accidents than anything else. Never climb a fence with your gun cocked."

REMEMBER: ALL THE PHEASANTS EVER BRED WILL NOT PAY FOR ONE MAN DEAD.


The article goes on to state rules and common-sense laws about hunting; namely, do not shoot anything that is not on your property without obtaining the property owner's permission first, do not shoot game out of season, and obey all hunting regulations in the area in which you hunt. Also do not go hunting alone if you can help it. Take a friend or a fellow hunter along, or a dog. Most dogs are intelligent enough to find help when an accident occurs.

Also, here is another helpful poem I lifted out of my father's old Boy Scout manual.


A Father's Advice

If a sportsman true you’d be
Listen carefully to me. . .

Never, never let your gun
Pointed be at anyone.
That it may unloaded be
Matters not the least to me.

When a hedge or fence you cross
Though of time it cause a loss
From your gun the cartridge take
For the greater safety’s sake.

If twixt you and neighbouring gun
Bird shall fly or beast may run
Let this maxim ere be thine
“Follow not across the line.”

Stops and beaters oft unseen
Lurk behind some leafy screen.
Calm and steady always be
“Never shoot where you can’t see.”

You may kill or you may miss
But at all times think this:
“All the pheasants ever bred
Won’t repay for one man dead.”

Keep your place and silent be;
Game can hear, and game can see;
Don’t be greedy, better spared
Is a pheasant, than one shared.


Happy shooting!

Thursday, May 17, 2012

Henry A. DuPont's account of the Battle of New Market from 1864!

Digitally archived in the Hagley Museum Library catalog. This is a pretty cool find.  It's a book he wrote about his action at the Battle of New Market.

The Battle of New Market, Virginia, May 15, 1864 :: Civil War Collection


Henry Algernon DuPont was a 1st Lieutenant in General Philip Sheridan's command of the Union Army who saw a lot of action in the Shenandoah Valley campaign.  He was revered as a local hero for receiving the Medal of Honor in the battle of Cedar Creek. He was born 1838 in Wilmington, Delaware and grew up in the Eleutherean Mills at Hagley on the Brandywine.  He served in the US Army from 1861 to 1875, and later was elected to United States Senate.

He most likely went into battle using his own gunpowder which his family produced at Hagley.

Full text of his accomplishments can be found here.

Henry DuPont's Wikipedia page


Other Civil War Resources in Hagley's collection pertaining to this battle:

Wednesday, May 16, 2012

My first reenactment of 2012: Battle of New Market

MAY 1864.

Thanks to my Southern cousin Miss Stephanie Ann and a soldier of the 3rd Arkansas Company 'H' , I will get front row seats to this exciting battle. Since my new group the PA 13th Reg't Bucktails are too far away to make it to the battle, I will be be going 'undercover' as a Southern civilian to observe the tactics of these Secessionist Rebels, who have apparently amassed quite a fighting force of their own. I'm told these are his new cadets from Virginia Military Institute, and it will be their first time on the battlefield. I will play the role of battlefield observer, artist and photographer, and will do my best to document the events which transpire thereon from a safe distance. This undertaking may still have certain dangers, and I hope the captured Rebel coat and hat my cousin has assured that she has procured for me to disguise myself for this occasion will not arouse suspicion.

Expect some new pencil sketches and fresh tintypes of the action, my dear readers. I assure that you will feel as though you were seeing this fight with your own very eyes! Pray for my safety and I shall be returning soon.

As always, your adventurous and somewhat hapless friend,

J.D.B.


Sunday, May 13, 2012

How to conceal items with an authentic wooden ammunition box

 I plan to make one of these if i can find enough lumber. Doesn't look too hard, so easy in fact that it dismays me so many reenactors still have blanket-covered plastic coolers.

This is based on the modern military idea of "ready boxes"...large containers pre-packed with everything a group needs and kept ready to grab and go, which helps eliminate the scramble of trying to get all your gear together the night before.  As items need to be replenished, they are periodically done so to keep it constantly ready.  Also makes carrying a reenactor's gear much less of a headache.

Here are some examples of ways to use your ammo box:

-Line the inside of your box with cedar for moth-resistant uniform storage

-Bolt two boxes together and remove the bottom of the box on top for greater capacity

-Line with industrial foam to use as a beer cooler

-Split inside of your box into compartments to house breakable glass containers / hold gun cleaning supplies

I finally found good instructions for making boxes to 1860s specifications. As soon as I find the source I will give proper credit.

(see attached PDF document)


Ammo Box Article pdf
View more ebooks on ebookbrowse.com